Friday, October 29, 2010

the Magic of Photoshop

More people are spending more dollars on professional photography equipment and tools. Some of the most popular are Canon or Nikon DSLR cameras and software like Adobe Photoshop CS5 (of which there is also Adobe Photoshop Extended CS5 Student & Teacher Edition available for a considerable discount).

Now, although technology is getting better and the price points are becoming so much more affordable, these advanced products are still very complex for most consumers. To use these product and get more professional results from them; many are forced to read instructions and look up tutorials off the Internet. There is nothing wrong with that...I even do it occasionally. However, even then you may not get what you are looking for.

Below I have created a few tips to make your snapshots more professional looking.

This it the original photo...taken by my mom in our back yard!

You might think "Hey, that is pretty good." and you would be right it is pretty good, just not great!
So, the first thing is to crop in just a bit, get a little closer to make the image appear more intimate...but in this case I still want to show the whole family so I will just take out some around the edges (tip: always crop an image with the same original dimensions - this is easily done by holding down the shift key when you crop. This keeps all your ratios the same-normally a 4 x 6 ratio-).

The second thing we do is go to our Image, Adjustment tool called Brightness/Contrast... This is a great tool to give you more depth to your images. Play with the tool a little and bump up the contrast tons that way you know how it looks and stop when you like it. Remember that you need to start with a well exposed photo (this will not work well with an under or over exposed photo)


Now we are looking better. See how the blacks are blacker and there is more separation between the subjects and the background?...that is the added depth from upping the contrast.
This next step is optional, but I think it is nice.

We will create a "halo" effect that helps to bring the eye to the center (where our subjects faces are). First go to Filter, Distort, Lens Correction...it will pull up a box and you want to to read: Remove Distortion 0.00, Fixed Red/Cyan Fringe 0, Fixed Blue/Yellow Fringe 0, Amount -100, Midpoint +65, Vertical Perspective 0, Horizontal Perspective 0, Angle 0, Scale 100. This should give you a good halo to put on most photos that need darker edges to help emphasis the center subject.

and this is the finished product!

So, you can see that you don't need to have mad skills to get a good photograph, you just have to know how to set up your shot to get a good exposure and know how to use your photographic tools to get the look you want. I hope this helps you achieve something beautiful!


— please leave a comment if you have a photo/photoshop question you would like answered and I will do my best to address it —
Wednesday, September 1, 2010

Age has Nothing to Do with It!

A good portrait has nothing to to with age or equipment!
So many people get caught up in taking photos of perfect looking models and purchasing the most expensive "professional" equipment out there in order to get people to take you seriously.
I say, "THAT IS CRAP!"
I have found that some of my best work has come from a $50 35mm film camera. Photographing regular people who are allowed to just be who they are. I think that talent comes from photographing with basic equipment and normally looking subjects and make something magical and fun happen.

Below is a set of images taken with a Canon Rebel XTi, 50mm lens
and the subject is much older than she looks!


Monday, August 9, 2010

Your Child

Regardless of the kind of camera you have when it comes to photographing children, especially your own, it can get tricky. So, below are a few ideas to help you come out of a massive headache with at least a few new and interesting images.


For a studio style look, find dark fabrics that absorb light. Like this "velvet like" chair cushion. It enables you to photograph inside using your flash or some window light and everyone will think you are a professional.


Don't stop taking photos. Get images of all your child's faces. You never know which face will turn out cute...especially when it is a candid one. AND try simple backgrounds that are simple yet interesting. The easiest and best looking backgrounds are textured walls. Like this old cement wall or a brick wall, worn wood, fence, or even colors like playground equipment.


Get close. Don't be afraid to get close to your subject. (but make sure that you will still get a clear image) You don't always need all of the head or face or body in every photo. This can also help with focusing on different parts like, for example, the mouth. You can draw the viewer to the child's new chompers.


Get creative. Although this might require an assistant to insure the safety of the child, try out something new. Like a window sill or photographing from under the child. Go for places that are not noticed as much and angles that might be unexpected for that subject.


Finally, have someone else take a photo of you with the child. As a Mother and photographer, there are always fewer images of me with my son than of anyone else. It is important that you get photographed as well. And have your friend or family member just keep firing the shutter as you play with the child. Once again, a candid photo brings out the reality and relationship between people. That will bring feeling and meaning to your photographs.

Thursday, July 15, 2010

Project: Night Light

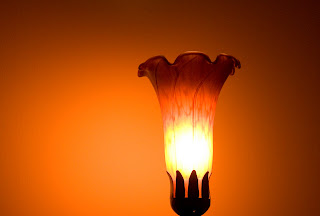
These images were taken in my bedroom at about 11pm.
All where photographed in low light produced by a small lamp.
Equipment was a Canon DSLR, 50mm lens.
Photographed at 1/60 sec., F-1.8 and ISO 1600.


I prefer to photograph with out a tripod and as such in low light situations such as these my best alternative was to jump to a higher ISO. However, this does come with consequences. The higher the ISO the more grain (pixels) you see in the image. That means that these images are not a good image for large prints (ie: 16x20 or larger). It is best to photograph in the lower ISO settings such as 100 or 200. You will get the highest quality image by doing this but you must compensate by adding more light to your subject.


Friday, July 9, 2010

Project: Belly Dancer

The Belly Dancer in these photos is Krista Kubie.
We did a simple photo session in her apartment by her sliding glass door.
Each image was photographed with natural light using a Canon DSLR.
50mm lens, ISO 200, F-1.8, and shutter speed no lower than 1/60.


Tip: to photograph inside with natural light the easiest thing to do is to set your camera for the F-stop wanted and then adjust the shutter speed as needed. NOTE: if you go below 1/60 sec. there is a great possibility of camera shake so you might need a tripod and a steady subject.

If you are wanting to photograph your subject in front of a window,
make sure you are exposing for the subject and not the window!
The light from the window will appear overexposed giving off a "white glow".